Why should I import my database?
Importing your database contacts into the Chime CRM is highly recommended. We recommend this for many reasons, the two most important being campaign retargeting and email.
- Retargeting: As part of Accelerator, we are running retargeting campaigns to your website visitors and CRM database. Without your CRM database we won't be able to add those contacts to the retargeting audiences that we are creating on the various advertising channels, like Facebook and Adroll.
- Email: A very powerful and complimentary product to the Accelerator service is Curaytor's Email Blast Tool. This tool allows you to create and send stunning plain text and visual emails to stay top of mind and deliver quality content. In order to take advantage of this email tool, your contacts will need to be uploaded into your Chime CRM.
Before getting started…
Are all leads going to be assigned to the account owner? If the answer is yes, then you can move onto step 1. If the answer is no, then you need to ensure all agents that will be assigned leads are added to Chime first. To add team members to Chime refer to this article.
Once all necessary team members are added to Chime, it’s time to clean your database file(s). Each agent on the team should export their own contacts and follow the steps below. Once each agent has cleaned their lists, you can send them to your Onboarding Project Manager.
Step 1. Assign the correct pipeline stage
Known as “Pipeline” in Chime, assigning the correct lead stage allows you to properly sort, follow up with, manage, and send relevant email marketing campaigns to your contacts. You likely already have a column for this in your database list. Below are the pipeline stages we recommend along with definitions for each:
- Leads - contacts that are newer to your database that have not yet been identified as being hot or cold
- Hot (Hot Prospect can also be used) - contacts that have shown interest in buying and/or selling with you in the near future and you want to follow up with them on a regular basis
- Nurturing (Nurture can also be used) - contacts that you have made contact with and possibly shown some interest but are not yet ready to commit to buying and/or selling
- Sphere - contacts in your inner circle. This would be friends, family, neighbors, or people in your local community
- Appointment Set - contacts that you have set an appointment with
- Buyer - Active buyers
- Seller - Active sellers
(If you prefer, you can group all current clients into a “Client” stage rather than breaking them out between buyers and sellers) - Past Client - Contacts that you have worked with in the past
- Bad Leads (Do Not Contact can also be used) - leads that you do not plan on contacting or using in your email marketing
Reminder: These are recommendations, not requirements. It is 100% acceptable to have other stages or use stages that are not listed above. However, you do need a column dedicated to the pipeline stage.
Step 2. Delete any irrelevant columns
Delete any columns that are completely empty or columns that you do not want or will not reference in your daily use of your new Chime CRM platform.
Be sure to remove any special characters (underscores, dashes, colons, exclamation point, etc.) from your column headers, or from the column data. Special characters do not import into Chime and could skew your data if not removed prior to the import.
Step 3. Identify Lead Type for contacts
Create a new column and title it “Lead Type”. Based on the lead source, identify the lead as either a “Buyer” or “Seller”. If they could be either a buyer or a seller, or if you’re not sure which one they are based on the lead source, use “Buyer, Seller” instead. If you have renter leads, “Renter” can be used. If leads do not fit any of these categories, use “Other”. An example for when you might use “Other” is if you have a handful of agents in your market in your database.
Step 4. Keep first and last names in separate columns
Please keep the first and last name in separate columns. We may be able to help you with this only if you are starting out with a singular column of first and last names (i.e. no Mrs. Smith and Mr. Smith or Jack and Jill in one column).
If you have your "spouses" contact information combined into one contact record in your previous CRM, the primary contact on that record will be the only contact record that is created when imported to Chime. If you want each spouse to be receiving your Curaytor email marketing, you will need to separate spouses into separate contact records in your current CRM, prior to exporting your data and importing it into Chime.
Step 5. Add an Assigned Agent column
If not already added, ensure there is a column for “Assigned Agent”. This will assign all leads to the agents specified in that column. If all contacts should be assigned to you, simply add your name the whole way down the column.
Step 6. Separate Tags with commas
If you would like to add tags to your leads profile, list all of them in one column separated by commas. For example, “123 Main St., Community Newsletter, Farming, etc.” The commas will ensure each comes in as a separate tag.
PRO-TIP #3: Add descriptive tags for each segment or bucket of contacts in your current database. Descriptive Tags (along with defining pipeline/stages) will enable you to send very targeted follow up and marketing messages that will provide value to the recipient based on where they are in your sales funnel.
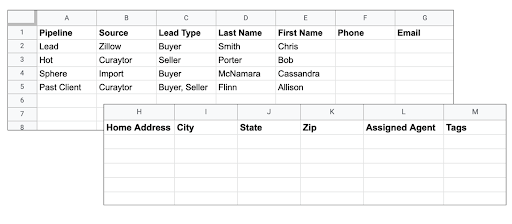
Example